
Video Walkthrough
Please follow along with the video walkthrough below, demonstrating how authorize a user account to send emails from any Microsoft 365 (Shared) Mailbox using Microsoft Graph.
The next step is to authorize a user account in your Microsoft Entra ID tenant. This user account will be used by WordPress to submit email messages to Microsoft Graph.
Selecting an Authorization Scenario
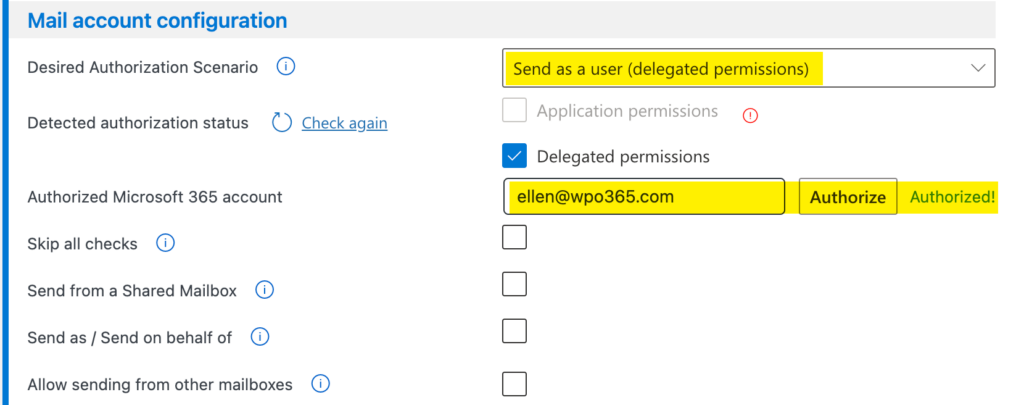
- Start by selecting the authorization scenario.
- Review the available options:
- Send as a user (recommended)
- Uses delegated permissions.
- Only a single, explicitly authorized user is allowed to submit emails.
- This is the safest and recommended option.
- Send as any user (application permissions)
- Allows sending email as any user in the organization.
- This poses a higher risk: if the website is compromised, an attacker could send emails from any account. Therefore use this option with caution.
- Send from a personal account
- Intended for scenarios such as sending email from a personal Outlook.com account.
- Send as any user (RBAC for EXO)
- Allows an application – instead of an authorized user – to send WordPress emails without the need to add permissions in Entra ID.
- Instead application access is restricted through Role Based Access Control in Exchange Online.
- Requires additional Role Based Access Control configuration in Exchange Online Admin Center.
- Send as a user (recommended)
- In this tutorial, continue with the option Send as a user for which the required delegated permissions have already been configured in the App Registration.
- After changing the authorization scenario:
- You are prompted to let the plugin check the status.
- Choose Check status.
- The status remains Unauthorized – visible on the label next to the Authorize button – because authorization has not yet been completed.
- Enter a user account you want to authorize, formatted as [email protected].

Please note The user account you enter here is the account that the plugin uses to authenticate and submit emails to Microsoft Graph. This account must be authorized.
However, this does not automatically determine the From address that recipients see.
WPO365 offers premium options that allow emails to be submitted using the authorized account, while appearing to recipients as if they were sent from a different email address.
- Click Authorize to start the authorization flow.
- You are redirected to Microsoft and asked to sign in as the selected user.
- If you already signed in earlier in the same browser session, you may not be prompted for a password again.
- After completing the flow:
- Scroll down to confirm that the user account is now listed as authorized – visible on the label next to the Authorize button.
- The authorization is now complete and successful.
Please note If you want to delete an existing authorization object, then you can simply uncheck the corresponding option e.g. Delegated permissions.
Also note You can re-authorize any time you want (but under normal circumstances there is no need to repeat the authorization because the plugin will refresh the authorization automatically using a so-called refresh token).