
Introduction
This guide explains how to restrict application access using Role Based Access Control in Exchange Online – when sending WordPress emails using Microsoft Graph – to securely grant your application access to one specific mailbox only.
RBAC for Applications allows you to assign permissions to an application (such as your WordPress website) so it can send emails via Microsoft Graph – without giving it unrestricted access across your entire tenant.
A key advantage of this approach is that permissions can be combined with a resource scope, enabling you to precisely control which mailboxes the application is allowed to access. This makes it possible to limit email sending to specific users or a shared mailbox, improving both security and compliance.
Another important benefit is that RBAC removes the dependency on a specific authorized user account, avoiding potential disruptions when that user’s consent or permissions are revoked.
This tutorial is based on Microsoft’s instructions to configure RBAC.
Why this works
Even though the plugin calls Microsoft Graph (for example, using /sendMail), the actual permission check is performed by Exchange Online. Exchange first verifies whether the application has an appropriate RBAC role assigned for the target mailbox. Only if no such role assignment exists will Microsoft Graph permissions, such as Mail.Send be evaluated.
Prerequisites
- To perform the steps in this tutorial, you will need in Microsoft Entra ID the Exchange Administrator role – for example to assign permissions.
- The steps in this tutorial cannot be completed using the Exchange Online Admin Center. Instead, configuration must be performed using PowerShell cmdlets and requires the ExchangeOnlineManagement module.
Remove previously granted application permissions for Mail.Send in Entra ID
Perform the following steps to remove (or ensure you already remove or never added) permissions (application or delegated) for Mail.Send in Entra ID.
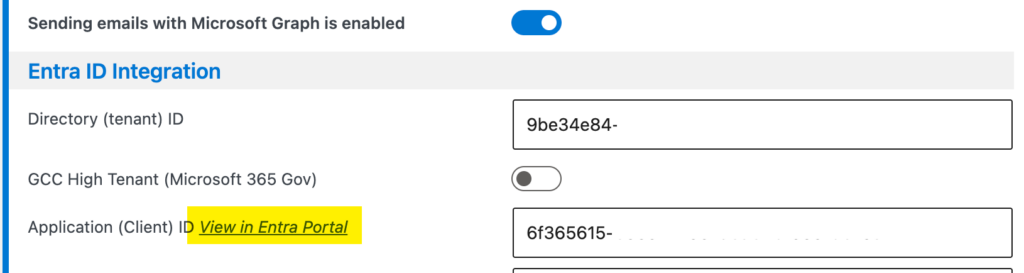
- Click the View in Entra Portal link on the plugin’s Mail configuration page.
- Open the API Permissions page.
- Search the list for Microsoft Graph Mail.Send application or delegated permissions. If found, remove those permissions.
- After you updated the API Permission, grant admin consent and if asked to remove permissions, confirm.

Connect to Microsoft Exchange Online using PowerShell
Perform the following step to install the ExchangeOnlineManagement module.
Install-Module ExchangeOnlineManagement -Scope CurrentUserEnter the following commands to connect to Microsoft Exchange Online.
Import-Module ExchangeOnlineManagement
Connect-ExchangeOnline
Create a new Service Principal
A Service Principal in Exchange Online represents an application instance within Exchange, but it is not the same object as the Service Principal (also known as an Enterprise Application) in Microsoft Entra ID.
Instead, the Exchange Service Principal should be understood as a reference to an existing Entra ID Service Principal. It enables Exchange Online to recognize and enforce permissions for that application, while the actual identity and registration of the application remain defined in Entra ID.
Issue the following command to create a new Service Principal in Exchange.
New-ServicePrincipal -AppId <Application ID in Entra ID> -ObjectId <Object ID in Entra ID> -DisplayName <name>Perform the following steps to look up the necessary IDs in Entra ID.
- Navigate to your App Registration in Entra ID (see above).
- From the App Registration’s Overview page continue to the Managed application in local directory. This is effectively the Enterprise Application counterpart of the App Principal – also referred to as Service Principal in Entra ID.
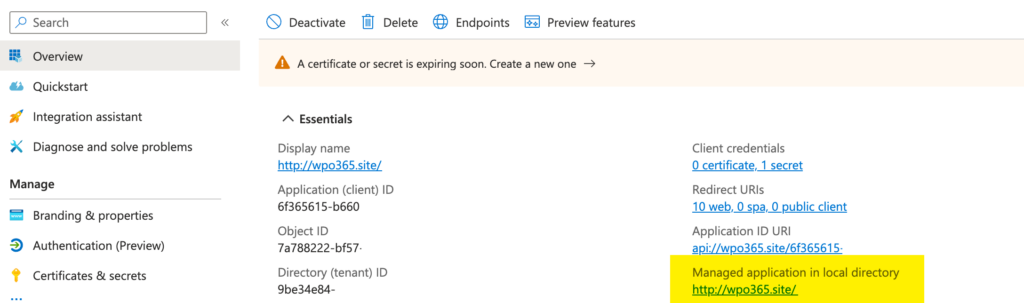
On the Overview page of the Enterprise Application, you’ll find the required IDs, as shown below.
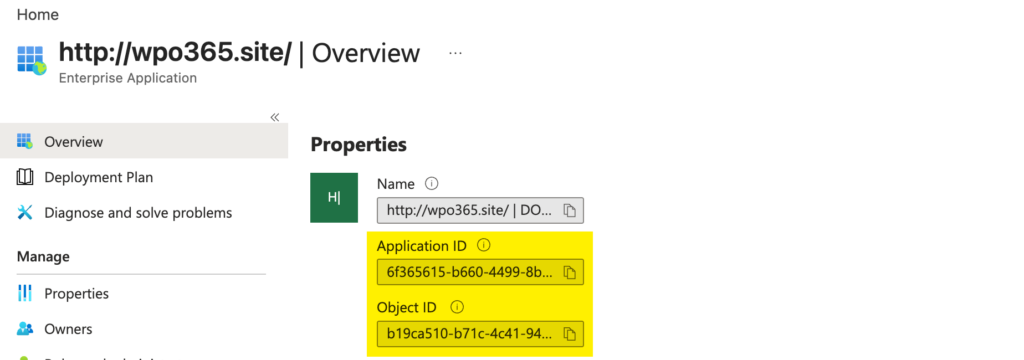

Make sure that you do not use the IDs from the App Registrations page, as it shows different values.
Finally, the name that you give your new Service Principal in Exchange can be decided randomly, or can even be omitted.
After you issued the New-ServicePrincipal command, you will receive an output that lists the new Service Principal’s App ID and Object ID. You will need the App ID for the next step.
You can always look up existing registered Service Principals in Exchange, by issuing the following command.
Get-ServicePrincipalCreate a new Management Scope
A management scope allows an administrator to define a set of mailboxes using a filter expression based on mailbox properties. This enables precise control over which mailboxes an application can access, making it possible to restrict email sending to specific users or shared mailboxes.
Enter the following command to create a new Management Scope.
New-ManagementScope -Name <Name> -RecipientRestrictionFilter "PrimarySmtpAddress -eq '<Email address>'"This command requires you to define two parameters.
- Name This is a human readable name that helps you remind what is being filtered. Avoid using special characters. This name is used in the next step when a new Management Role Assignment is created.
- Email address Here you define the email address that the application is permitted to use.
Create new Management Role Assignment
A management role assignment ties an application, a role, and a scope together, defining what actions the application can perform and which mailboxes it can access.
Perform the following command to create a new Management Role Assignment.
New-ManagementRoleAssignment -App <App ID> -Role "Application Mail.Send" -CustomResourceScope "<Name of Management Scope"This command requires you to specify the following parameter.
- App ID This is the App ID of the Service Principal that you initially created in Exchange. Don’t confuse this ID with the App ID of the App Registration in Entra ID.
- Role For this tutorial always use Application Mail.Send.
- Name of Management Scope Enter the exact name of the new Management Scope that you created in the previous step.
Test Service Principal Access
Enter the following command to perform a quick check to ensure that the configured authorization works as expected.
Test-ServicePrincipalAuthorization -Identity <App ID> -Resource <Email address>This command takes the following parameter.
- App ID This is the App ID of the Service Principal that you initially created in Exchange. Don’t confuse this ID with the App ID of the App Registration in Entra ID.
- Email address Use the email address that the application is permitted to use. You can of course also test with an email address that the application should NOT be permitted to use.
Update the WPO365 configuration to use RBAC
All that is left is the final step to update the plugin’s configuration on its Mail configuration page as follows.
- Go the plugin’s Mail configuration page.
- Locate the Desired Authorization Scenario dropdown and select Send as any user (RBAC for EXO).

- Scroll further down and enter a recipient for a test email and finally click Save configuration + send test email.