
Video Walkthrough
Please follow along with the video walkthrough below, demonstrating how to configure WPO365 Single Sign-on, when adding Microsoft (Entra ID) login to WordPress using the OpenID Connect protocol.
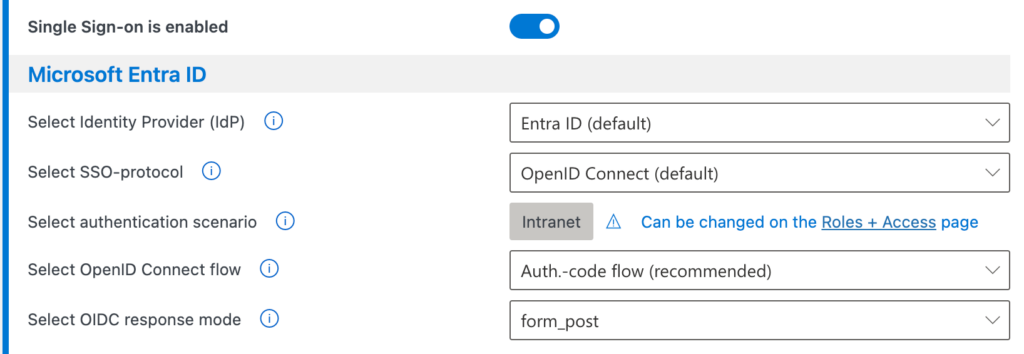
Select the Microsoft Entra ID tenant type
- Open the WPO365 menu and select Single Sign‑On.
- Ensure that the Single Sign‑On toggle is enabled.
- Specify the type of Microsoft Entra ID tenant you want to integrate with.
- The default option is:
- Entra ID (default) – A directory for employees of an organization (workforce).
- Alternative tenant types include:
- Azure AD B2C / Entra External ID – For customer‑facing identities.
- GCC High – for U.S. government environments.
- For this tutorial, select the default Entra ID (workforce).
Choose the Single Sign‑On protocol
- Select the protocol to use for Single Sign‑On:
- OpenID Connect
- SAML 2.0
- Choose OpenID Connect, as te protocol to use for Single Sign-on, because it:
- Handles both authentication and authorization.
- Allows WPO365 to retrieve an access token on behalf of the signed‑in user.
- Enables access to Microsoft services such as:
- SharePoint Online.
- Power BI.
- Microsoft Graph.
- Note that SAML 2.0 is covered in a separate tutorial.
Select the OpenID Connect flow
- Choose Authorization Code Flow (recommended) as the OpenID Connect flow to implement.
- This is the most secure and widely recommended flow.
- Be aware that:
- The Hybrid Flow is not recommended unless you want to allow users from other tenants to sign in.
- Cross‑tenant sign‑in scenarios require additional (premium) configuration and are outside the scope of this tutorial.
Configure the response mode
- Review the OpenID Connect response mode setting.
- Leave the default option form_post selected.
- Only consider switching to query if:
- You are troubleshooting compatibility issues.
- You are integrating with a third‑party MFA provider (for example Duo).
Save configuration
- Finally, scroll down to the end of the page and save the updated configuration.