
Video Walkthrough
Please follow along with the video walkthrough below, explaining the steps required to configure API Permissions when adding Microsoft (Entra ID) login to WordPress using the OpenID Connect protocol.
Configure API permissions
- As the final configuration step, open the API permissions page of the registered application in Entra ID.
- Note that the Email and Profile permissions were already added automatically when the optional claims for the ID token were configured.
- Add the remaining required Microsoft Graph > Delegated permissions under the OpenID permissions category:
- offline_access
- openid
- After adding these permissions, click Grant admin consent.
- Confirm that you want to grant consent as an administrator for your tenant.
- Understand that if admin consent is not granted:
- Each user would be prompted to consent individually during sign‑in.
- This typically results in a less desirable user experience.
- If the Grand admin consent for … is greyed out then you do not have sufficient permissions to continue. Since this is mandatory, you must contact your Global Administrator and ask for help.
- Once consent has been granted successfully, the app registration is complete and you can return to the WPO365 configuration pages in WordPress.
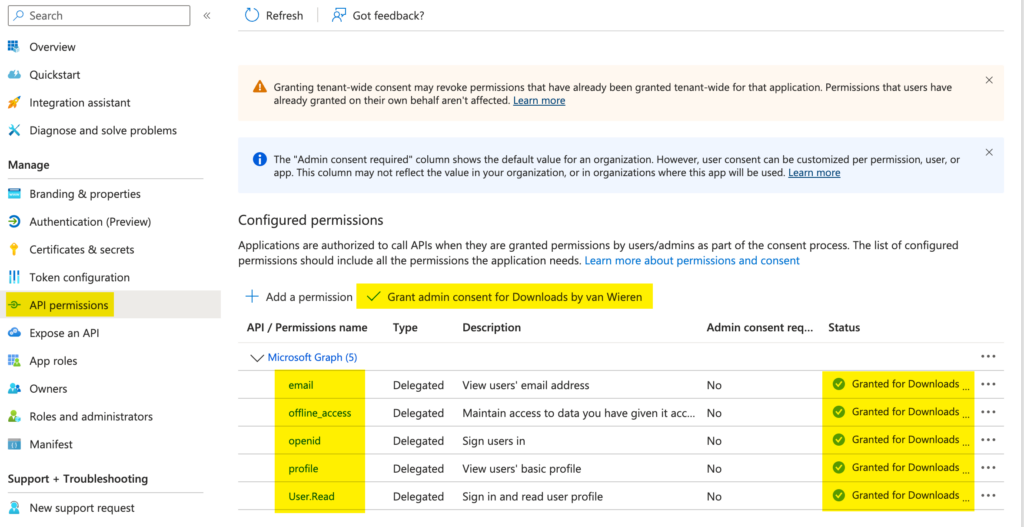

Please note that you should not delete the default User.Read permission.
Also, If you plan advanced integration and embedding of Microsoft 365 services in WordPress then you probably need to add additional permissions on this page. Please consult the integration guide for Microsoft 365 services for in-dept guidance.