
Row-level security (RLS) enables you to control access to rows in a database table through group memberships. When you embed items, you can use RLS to restrict user access to specific rows of data. With RLS, different users can work with the same items but see different data. Read more …
If you’re embedding for your organization and your users sign in with Microsoft (Single Sign-on), RLS works the same as it does within the Power BI service directly. There’s nothing more you need to do in your application. For more information, see Row-Level security (RLS) with Power BI.
If you’re embedding for your customers – users that do have a valid Power BI Pro license, then you must manually edit the embed token so it is issued for an Effective Identity (a user with one or more roles assigned through groups in the Power BI service).
The following steps explain, how you can manually edit the embed token and define Effective Identity when embedding a Power BI report with Row Level Security (RLS) for your customers.
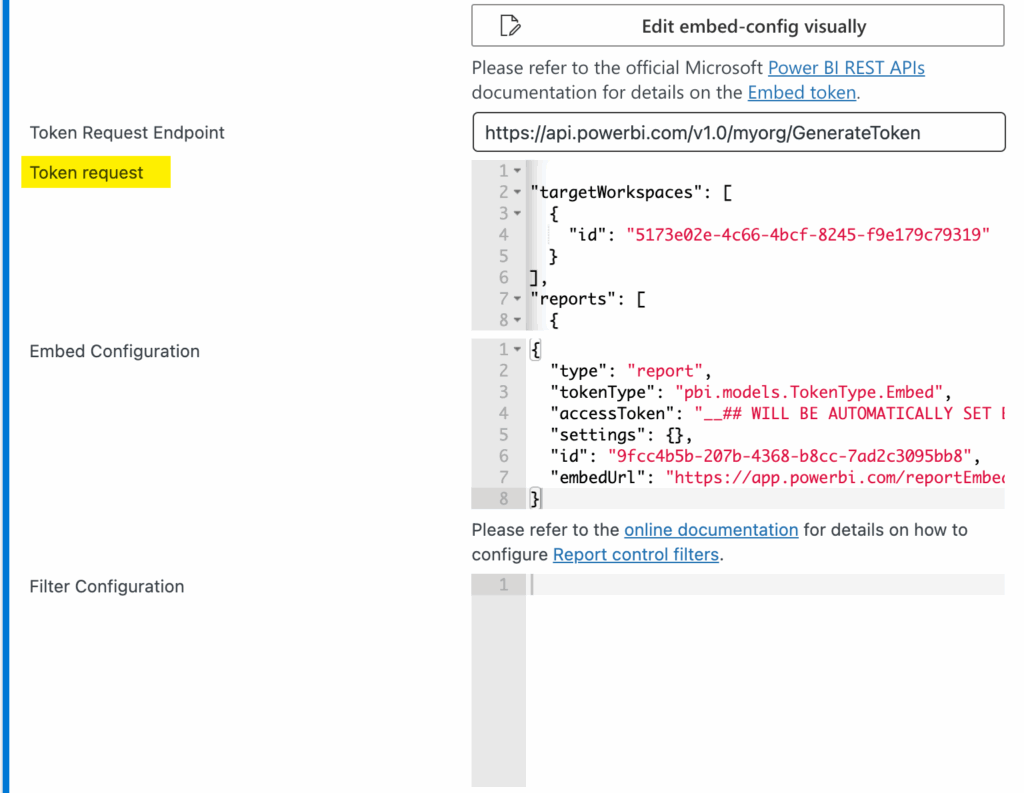
- Click the button Edit embed-config manually (JSON), as shown below.


Note that the button changes to Edit embed-config visually. Clicking the button again will revert the generator back to its previous state and manual changes to the any of the settings below will be ignored.
- Clicking the button will allow you to manually edit the following settings:
- Token Request Endpoint The endpoint that WPO365 will contact to request an embed token from. Please note that for (Paginated) Reports, WPO365 uses the “V2” endpoint. For other items, the “V1” endpoint will be used. Normally, there should be not need to change this value.
- Token Request The payload (data) that WPO365 will send to the Token Request Endpoint when requesting an embed token. It is this configuration that we will change by adding identities.
- Embed Configuration The actual configuration object WPO365 injects into the Power BI client / SDK when loading a page with embedded content. Editing the configuration object is covered separately.
- Filter Configuration The filter configuration for the embedded item. The configuration of filters is explained separately.
- By default, the V2 Token request JSON is as follows (scroll to the end for a V1 example):
{
  "targetWorkspaces": [
    {
      "id": "your-workspace-id-goes-here"
    }
  ],
  "reports": [
    {
      "id": "your-report-id-goes-here",
      "allowEdit": false
    }
  ],
  "datasets": [
    {
      "id": "your-data-set-id-goes-here",
      "xmlaPermissions": "Off"
    }
  ]
}- To configure the embed token to account for a user and one (or more) role(s) you must update the Token request JSON as shown below by adding an identities property with three members for the username, role(s) and dataset(s). Optionally, you can add customData.
{
  "targetWorkspaces": [
    {
      "id": "your-workspace-id-goes-here"
    }
  ],
  "reports": [
    {
      "id": "your-report-id-goes-here",
      "allowEdit": false
    }
  ],
  "datasets": [
    {
      "id": "your-data-set-id-goes-here",
      "xmlaPermissions": "Off"
    }
  ],
  "identities": [
      {
          "username": "your-user-name-goes-here",
          "roles": [ "your-role-goes-here" ],
          "datasets": [ "your-data-set-id-goes-here" ],
          "customData": "your-custom-data-goes-here"
      }
  ]
}- You can use dynamic tokens when defining an Effective Identity. Dynamic tokens will be replaced with direct attributes of a WordPress user or alternatively user meta. Direct attributes are properties of the WordPress WP_User object e.g. login_name or user_email. User meta are custom user fields that you can add to a user’s profile using third party plugins. The following example shows how you can:
- Use direct user attributes by combining the prefix wp_ with a WP_User object’s property name e.g. wp_user_email
- Use user meta attributes by combining the prefix meta_ with the WordPress user meta key’s name e.g. meta_power_bi_roles
{
  "targetWorkspaces": [
    {
      "id": "your-workspace-id-goes-here"
    }
  ],
  "reports": [
    {
      "id": "your-report-id-goes-here",
      "allowEdit": false
    }
  ],
  "datasets": [
    {
      "id": "your-data-set-id-goes-here",
      "xmlaPermissions": "Off"
    }
  ],
  "identities": [
      {
          "username": "wp_user_email",
          "roles": "meta_power_bi_roles",
          "datasets": [ "your-data-set-id-goes-here" ],
          "customData": "wp_user_email"
      }
  ]
}- It is important to note that the roles property in this case is not written as an array in square brackets. The WPO365 plugin will ensure that the value used to replace the dynamic token is always an array.
To add user meta to a user’s profile we used two plugins from Meta Box (see https://metabox.io/) to allow a user administrator to define Power BI roles for WordPress users.

With (the premium plugin) MB User Meta installed we just needed to add the following PHP snippet to our WordPress (child) theme’s functions.php.
add_action('rwmb_meta_boxes', function ($meta_boxes) {
    $meta_boxes[] = array(
        'title' => 'Power BI Roles',
        'type'  => 'user', // THIS: Specifically for user


        'fields' => array(
            array(
                'name'     => 'Power BI Roles',
                'id'       => 'power_bi_roles',
                'type'     => 'select_advanced',
                'multiple' => true,
                'options' => array(
                    'Canada' => 'Canada',
                    'Germany' => 'Germany'
                ),
            ),
        ),
    );
    return $meta_boxes;
});
This example renders an easy-to-use custom user profile field to edit a user’s Power BI roles.

V1 Token Request
Perform the following steps, if you want to switch (back) to requesting an embed token from the V1 endpoint.
- Switch to the Edit embed-config manually (JSON) mode, as explained in the previous section.
- Update the Token Request Endpoint to https://api.powerbi.com/v1.0/myorg/groups/your-workspace-id-goes-here/reports/your-report-id-goes-here.
- Update the default Token request as shown below.
{
  "accessLevel": "View"
}- To add an effective identity, add an identities property as explained previously for the V2 token request, as shown below. The use of dynamic tokens is also supported in this case.
{
  "accessLevel": "View",
  "identities": [
        {
            "username": "[email protected]",
            "roles": [ "Canada" ],
            "datasets": [ "795b2d57-22d6-4c08-9db3-b660fe9b3483" ]
        }
    ]
}
Troubleshooting
username()
Whether or not the username provided is being honored when you’re embedding for non-Power BI users (app owns data) is depending on whether your DAX expression is expecting a username or not. If your DAX expression does not include a username() or userprincipalname() expression then the value provided as Token request’s username will have no effect. In that case RLS will always return the data for the role, even if you assigned specific users to the role. When the app owns data, the effective identity is your App registration‘s Service Principal ID that you have granted admin access to the workspace.
Token cache
If you have made changes (especially in Azure AD to the permissions or in Power BI to the RLS configuration) you may notice that your changes do not have any effect. This may be the result of the plugin caching (access and embed) tokens to reduce the number of calls to the corresponding Microsoft services. You can simply delete this cache by cleaning your browser’s session storage.
