
Video Walkthrough
Please follow along with the video walkthrough below, demonstrating the necessary steps to embed Power BI for your organization in WordPress.

Before you begin, make sure you are familiar with the prerequisites and understand the difference between the two main embedding scenarios: embedding for your organization and embedding for your customers. This tutorial focuses specifically on the organizational embedding approach, where users sign in with their Microsoft 365 accounts and access content based on their assigned permissions and licenses.
Prepare Microsoft Entra
Perform the following steps, to (create and) update the registered Microsoft Entra application, so that users can sign in with their Microsoft account, and view Power BI content embedded in WordPress.
- Register a Microsoft Entra application – so that users can sign in using Microsoft’s Single Sign-On (based on OpenID Connect) – by following the steps detailed in the following tutorial: https://tutorials.wpo365.com/courses/single-sign-on-openid-connect/.
- Configure the following API Permissions for the application that you registered in Microsoft Entra:
- Power BI Service > Delegated > Dashboard.Read.All
- Power BI Service > Delegated > Dataset.Read.All
- Power BI Service > Delegated > Report.Read.All
- Power BI Service > Delegated > Workspace.Read.All
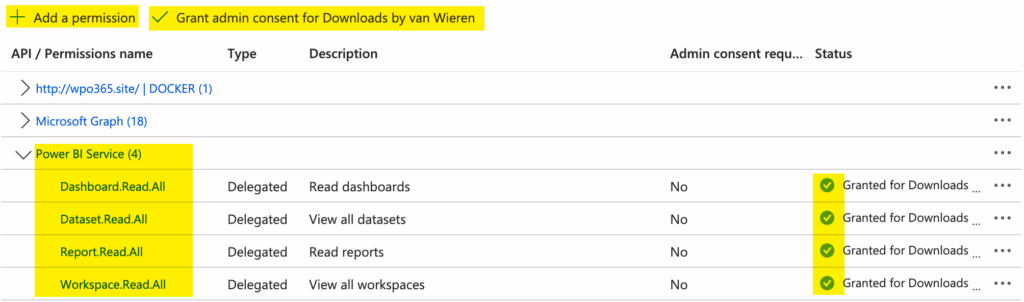
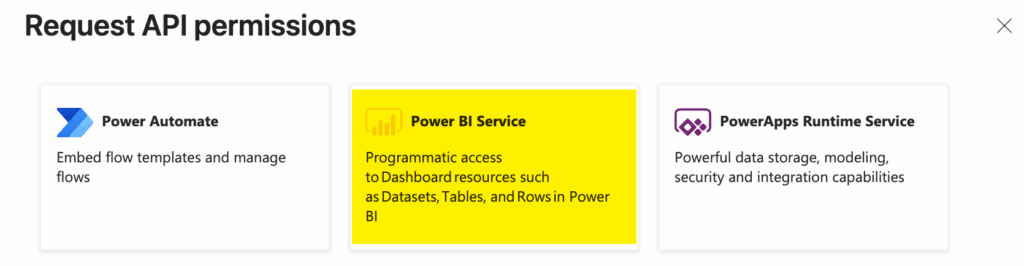
- To add these permissions, go to https://entra.microsoft.com/ – sign in – and continue to Entra ID > App Registrations. Find your App Registration and continue to its API Permissions page. In the section Configured permissions click the + Add a permission button. Locate the Power BI Service card, as shown below and add the aforementioned permissions.
- Once you have finished adding the necessary permissions, click Grant admin consent for [your organization]. After that, the permissions list should look similar to the screenshot shown earlier under Configured permissions.
Prepare your Power BI service
Perform the following steps to ensure that your Power BI service can serve embedded content to users in your organization.
- Ensure all users who will view embedded content have a Power BI Pro or Premium Per User (PPU) license and have access to the Power BI workspace and report.
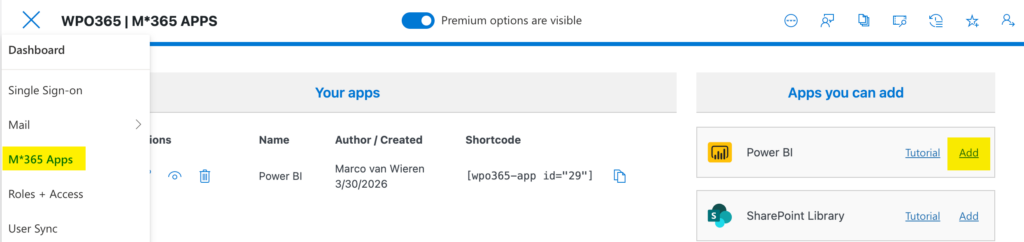
Enable Microsoft 365 Apps Support
- Navigate to WP Admin > WPO365 > M*365 Apps configuration page.
- When visit the page for the first time, you may be asked to Enable WPO365 for apps to allow client-side JavaScript applications (such as WPO365’s Power BI embed-app) to embed Microsoft 365 content.
Add a Power BI App
- From the list of Apps you can add select Power BI and click Add.
- The configuration screen opens automatically.
The plugin will immediately validate prerequisites and permissions for a default configuration and may report an error. If that is the case, read the error carefully, close the notification and re-open the configuration screen.
Resolve Missing Power BI Permissions in Entra ID
Note that this step may be skipped if you already assigned the permissions in the step Prepare Microsoft Entra.
- Open the Entra Portal (already open in another browser tab).
- Navigate to API permissions for the app registration.
- Click Add a permission → select Power BI Service.
- Add the following delegated permissions:
- Dataset.Read.All
- Dashboard.Read.All
- Report.Read.All
- Workspace.Read.All
- Click Add permissions.
- Grant Admin consent. This allows users to use the permissions securely and they won’t be asked individually to grant consent.
Because permissions are delegated, users will only see content they already have access to in Power BI. Report.Read.All therefore means “Read all the reports I have access to”.
Refresh the WordPress Authentication Session
Note that if you have just added new permissions, you must refresh the WordPress Authentication Session.
- Return to the WordPress site.
- Sign out.
- Sign back in using your Microsoft account. This ensures the new permissions are included in the access token.
Configure the Power BI App
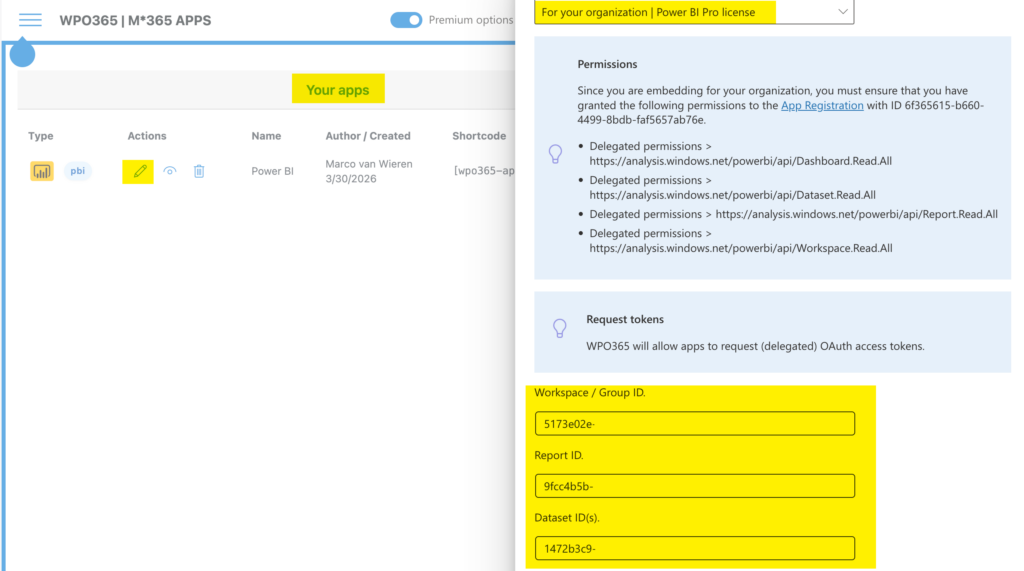
- Return to M*365 Apps and click the pencil icon to re-open the app’s configuration screen.
- Optional: Change the Friendly name e.g. “Sales Report”.
Note that when you change the configuration, it is auto-saved. During this time the close button is briefly disabled. The “Last saved” timestamp confirms that the configuration was successfully auto-saved.
Select the Content Type
- Continue with the configuration and choose Report as the content type. Alternatively, you can choose Dashboard, Tile or Paginated Report (premium-only).
Choose the Embed Scenario
- Select Embed for organization, which is intended for Entra ID users with Power BI licenses.
- The Embed for customers option is premium-only on the other hand requires Power BI Premium capacity.
Collect Power BI IDs
- Open app.powerbi.com in a new tab.
- Navigate to the workspace containing the report.
Workspace (Group) ID
- Open the workspace.
- Copy the group ID from the URL.
- Paste it into the Workspace ID field.
Report ID
- Go to Reports in the workspace.
- Copy the report ID.
- Paste it into the Report ID field.
Dataset ID
- Return to the workspace view and now open the dataset.
- Copy the dataset ID.
- Paste it into the Dataset ID field.

Review Embed Configuration
- The configuration now defines:
- Workspace location
- Report to embed
- Dataset used
- Internally WPO365 creates a Power BI embed configuration JSON.
- Advanced JSON editing is available only in premium versions.
Preview the Embedded Report
- Return to the list of Your apps and click the Preview icon of the app you are currently configuring.
- Confirm success:
- First the Power BI loading logo appears. Note that you can choose to replace this logo with a custom splash image (premium-only).
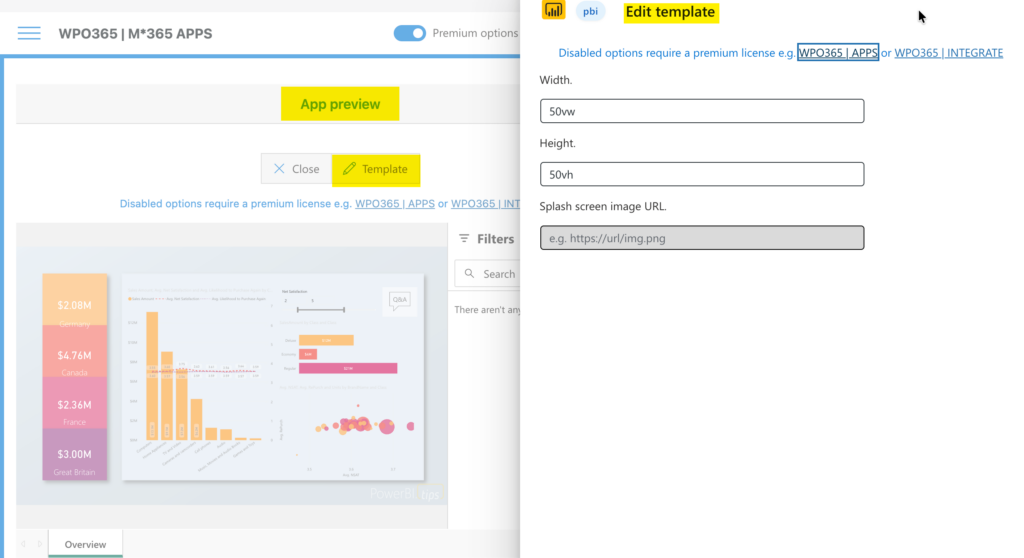
Adjust Layout (Optional)
- Open the Template settings:
- Set width (e.g. 50%)
- Set height (e.g. 60vh)
- Close the Template panel.
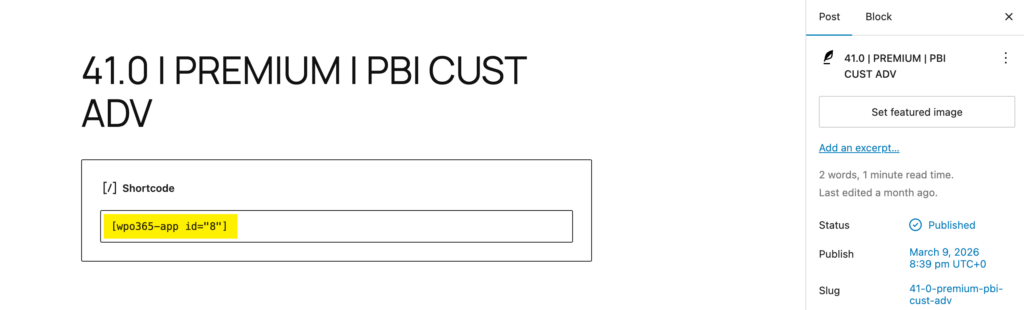
Add the Report to a Page or Post
- Copy the generated shortcode.
- Create a new WordPress page or post.
- Type “/shortcode” to add a new shortcode block to the page and paste the shortcode into it.
- Publish the page.
Verify the Result
- View the published page.
- Confirm:
- The Power BI report loads correctly.
- Authentication happens automatically through SSO.
Note that Row-Level Security (RLS) works automatically because users are authenticated with Microsoft accounts.
A premium license is required for UI customization options such as:
- Hiding filters
- Choosing default pages
- Custom page navigation