If you wish to embed a SharePoint Library in WordPress, you have two options. You can create a WordPress shortcode using the generator and add it to a page or add a Documents block to a page.

If you wish to embed a SharePoint Library in WordPress using WPO365’s Documents block (a Gutenberg block editor) then please continue with Option B | Add a WPO365 Documents block instead.
Perform the following steps to create a WP shortcode to embed a SharePoint Library in WordPress.
- Navigate to WP Admin > WPO365 > … > SharePoint / OneDrive List or Library.

Basic configuration options

The basic free version of the embedded SharePoint Library is included in the WPO365 | LOGIN plugin that can be downloaded for free from the WordPress Plugins Directory and the WPO365.com website.
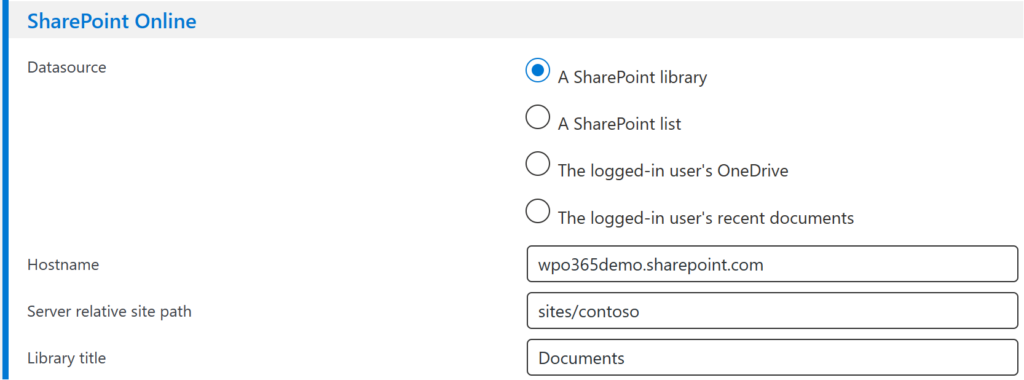
- Select A SharePoint Library from the Datasources dropdown.

To learn about the other available datasource that you can connect to, check the following links:
- SharePoint Online List
- OneDrive
- Recent Documents
- Type the hostname of your SharePoint Online home. For example, in our case we enter wpo365demo.sharepoint.com because our SharePoint Online home is https://wpo365demo.sharepoint.com.
- Enter the managed path of the site collection where the library that you wish to embed resides, for example sites/contoso.
- Enter the title of the library that you wish to embed. Please note that the title of the library can be found in SharePoint just above the list with documents, for example Documents and not
Shared%20Documents.aspx. - Optionally, you can change the Pagesize. This is the number of items that WPO365 will use to page through the results of query, in case the total number of items is larger than the pagesize.
- Optionally, you can choose to Hide message bar. The message bar is mainly used by the free version of the embedded library, to inform that this version does not support folder navigation.

Advanced premium options

Premium options are unlocked by the WPO365 | M365 APPS addon or the WPO365 | INTRANET bundle.
Please note When you upgrade to benefit of any of the premium options, you must create a new shortcode and replace shortcodes that you created with the free version included in the WPO365 | LOGIN plugin.
- Folder navigation (= breadcrumb navigation) will be enabled by default and does not require further configuration.
- Optionally, you can specify a Folder (relative path or empty for root) that is below the root folder of the library. If entered, only items in that folder (and any folders nested in that folder) will be available to users. For example entering General/HR Guidelines will instruct WPO365 to only show items in that folder and in folders nested in that folder.
- Optionally, you can enable users that do not have an enterprise account in your Microsoft Entra ID / Azure AD to view items in the embedded SharePoint Library by checking the option to Allow anonymous users. Please note, however, that this requires additional configuration. See Advanced | Access for “anonymous” users.
- Optionally, you can Use query string for configuration. If checked, you can “inject” the configuration of the app’s hostname, server relative path, library title and folder by means of a dynamically assembled query string. Refer to the example below to understand how to build the query string.
https://your-wordpress-website/page-with-embedded-app/?serverRelativePath=sites%2Fcontoso&listTitle=Documents&libraryRelativeFolderPath=General%2FCollateral- Optionally, you can edit the Columns that the block will display and can connect each of those columns with a (custom) SharePoint list item field. Please check Advanced | Customize your columns for details.
- Optionally, you can edit Translations to support your own language instead.
- Optionally, you can check the option to Show “Open in SharePoint” link. If checked, a link that will open the embedded library in SharePoint Online will be displayed.
Test your configuration
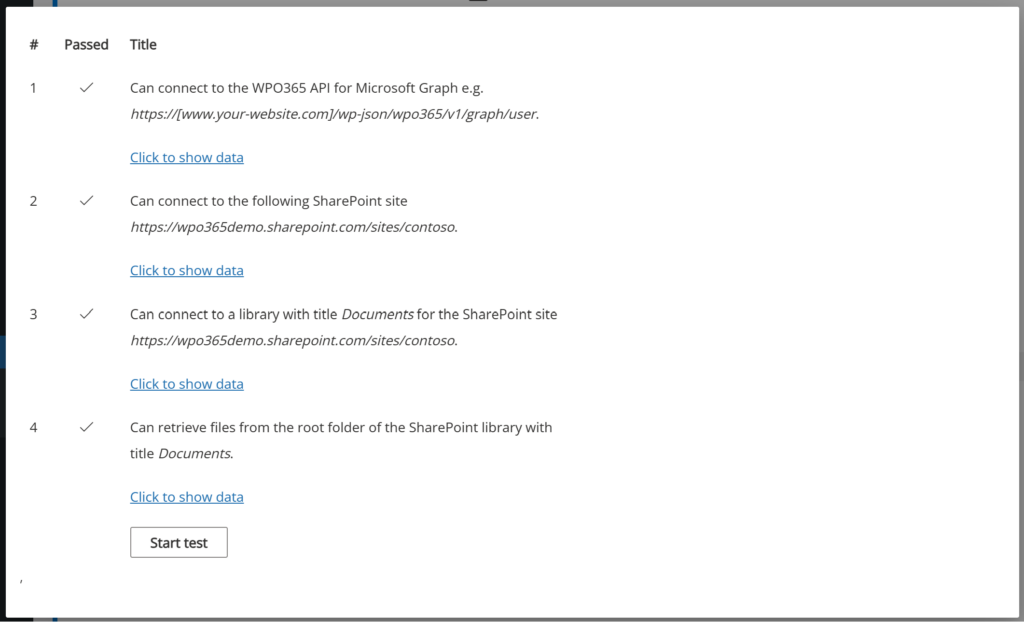
After you completed your configuration, it’s time to test it by simply clicking Test configuration at the bottom of the generator, followed by the Start test button on new panel that appeared.

Add shortcode to a WordPress page or post
Perform the following steps to add the generated shortcode to a WordPress page or post after you clicked to Copy the short code to clipboard.
- From the WordPress Admin Bar, click + New to add a new WordPress page or post.
- On the page or post, type short code in the block navigator and click the short code shortcut to add a new short code block to the page or post.
- In the short code editor, click Ctrl+V (or right mouse click and click Paste) to paste the short code.
- Publish the page and then click View post to check the result.

