

By default, WordPress sends visitors to the standard wp-login.php page to sign in. This is a generic login screen that rarely reflects your organization’s branding or authentication requirements. This guide shows you how to configure a custom Login Route and hide wp-login.php, allowing you to replace the default experience with a branded login page at https://yoursite.com/wpo/login. From there, you control the appearance of the page, including its logo, colors, title, and text, and decide how users can sign in, whether through Microsoft accounts only or through a combination of Microsoft and WordPress credentials.

Before you start: these options are part of WPO365’s premium extensions (for example ESSENTIALS, PROFESSIONAL or INTEGRATE). If you don’t see them on your Login / Logout page, check that a compatible premium plugin is active and that your license is valid.
Configure a custom Login Route
- Go to WordPress Admin > WPO365 > Login / Logout.
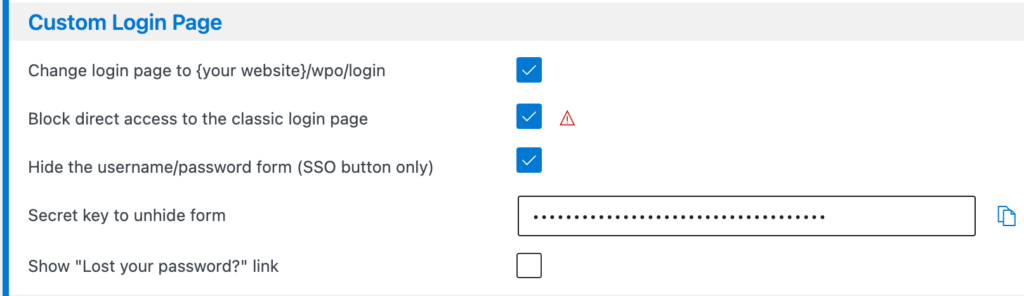
- Check Change login page to {your website}/wpo/login.
- As soon as this is on, a few more options appear underneath it.
- Once enabled you can customize the Login and Logged Out pages.
Hide wp-login.php
- Check Block direct access to the classic login page”to make wp-login.php redirect to your new custom page automatically. Now visitors (and old bookmarks/links) can no longer reach the old page directly.
Only turn this on after you’ve confirmed signing in with Microsoft works reliably on your site. If Microsoft sign-in ever breaks, this option removes your safety net unless you’ve also set up the secret key described below.
Hide the username / password fields / Force SSO
- Check Hide the username / password form (SSO button only) if you want visitors to see only the Sign in with Microsoft button, with no way to type a WordPress username and password.
- Because this can lock you out of using a WordPress username and password entirely, you’ll also must fill in Secret key to unhide form. This is a private, hard-to-guess piece of text (at least 32 characters, letters / numbers / underscores / hyphens only). Anyone who knows this secret can reveal the hidden form by visiting your login page with the secret added to the web address, for example https://yoursite.com/wpo/login?your-secret-here. Keep this secret somewhere safe, just like a password.
- A warning icon appears next to this option until a valid secret is entered, as a reminder.
Other configuration options
- Check Show “Lost your password?” link to display that link on your custom login page. Once checked, a Password length field appears where you can require newly-chosen passwords to be at least a certain number of characters.
- Check Show link to the classic login page if you’d like a small link on your custom page that takes visitors to the original wp-login.php. This option disappears if you’ve turned on Block direct access to the classic login page above, since offering a link to a page that’s blocked wouldn’t make sense.
Troubleshooting
- If your site uses a multi-lingual plugin (e.g. WPML) and you’ve set the plugin’s Authentication scenario to Intranet, visiting the classic wp-login.php directly can still send you to Microsoft to sign in first, even though it’s meant to always be reachable. This happens because the multi-lingual plugin may add a language folder (e.g. /en/) to that URL too, and WPO365 no longer recognizes the result as the login page. The same applies to favicon.ico. If you notice this, add the language-prefixed variants (e.g. /en/wp-login.php and /en/favicon.ico – one per language you support) to the Pages freed from authentication list on the plugin’s Roles + Access configuration page.